How to build a panelled wall using Button-fix
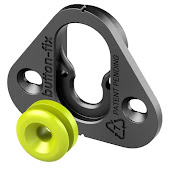
Step-by-step guide to how to mount a wall panel using the award-winning Button-fix panel fixing system - a fitters' favourite. For full details of the Button-fix range, please visit https://button-fix.com/ Video commentary: Button-fix, the versatile secret fixing system, makes panelling a wall quick, easy and precise. This film shows step-by-step how we used the system to build a panelled wall supported by a timber stud frame. Of course there are many other ways it can be used too, where you have an existing wall for support, but the basic principles are the same. With Button-fix, all the fixings are hidden yet the panels can still be removed, to access services behind or to replace an accidentally damaged panel. We’re using the Type 1 Button-fix, which is specifically designed for heavy-duty applications. The Fix can be surface-mounted with a pair of 5mm pan head screws, leaving an 8mm gap behind the panel. Alternatively, if space is critical or if you want to maximise the strength of the fixing, the Fix can be rebated. Use 4.5mm countersunk screws to ensure the screw heads don’t project. The Fixes are spaced to suit any horizontal breaks in the panelling or, for full height panels, approximately every 600mm. Before installing the battens on site, it is important to check that the timber stud frame is vertical and that all the studs are in a level plane. Vertical studs should approximately align with panel breaks, but their exact position isn’t critical - what’s important is that the studs are vertical and in plane. Another useful accessory is the Button Marker. Theses are bright red so are easily spotted in the tool box. Snap one into every Fix behind the fascia panel you are about to install. Their sharp metal points will be used to mark the back of the fascia panel where the Buttons should be. Offer up the fascia panel and carefully align it in the desired position. When you’re happy it is correct, press firmly over each Fix and Marker. Use the indents on the back of the panel as guides for drilling pilot holes for the Buttons. There are two types of Button: a lime green one for countersunk wood screws - use a 5mm or a number 10 screw - and an orange one for Euroscrews. Euroscrews, which are also known as Varianta screws, are ideal for thinner panels and the ones that work best with the orange Buttons are 6.2mm in diameter with a 7.8mm head. They require a 5mm diameter pilot hole to be drilled in the panel. Before installing the panel, first remove all the red Button Markers. You can re-use them when marking out the next panel. Then offer up the panel with all the Buttons fitted. The design of Button-fix makes it easy to align the fixings, even though you are working blind. Once you feel that all the Buttons are sitting in the Fixes, pull sharply downwards to fully engage them. You will hear a “Click” as they lock home. In some circumstances you may want the panel to be easily removable, so you can reduce the strength of the click-fit by snapping off the little ears of some, but not all, of the Fix mouldings. Just in case the plastic fragments fly off, always wear safety glasses when doing this. At this panel junction the architect has detailed a visible metal edge between panels. With the 8mm gap created by surface-mounted Fixes there is sufficient space to screw an aluminium T-section to the batten behind the fascia panels. We’ve also orientated some of the Fixes here so that the fascia panel slides on sideways rather than dropping down vertically like the first panel. Both methods are just as strong and you can choose the orientation that best suits your application. A suction pad makes handling the panel so much easier. To engage or disengage the Type 1 Button-fix, the panel needs to slide by 15mm. The 25mm flash gap detail gives plenty of clearance for this panel to disengage sideways. If your Button-fixes are orientated vertically, you will need a similar gap above the panel instead. To summarise, we’ve panelled a wall with Button-fix Buttons on the back of the fascia panels. The Type 1 Fixes are either rebated or surface-mounted onto vertical battens that we prepared off-site. These battens are fixed directly to the timber stud frame. We hope this example is similar to a project you may have to do. You could typically find it in a commercial washroom to conceal the plumbing. In this particular application, space the vertical studs to suit the sanitary ware and make wider ply battens that will span across a pair of studs. This provides a much firmer ground for connecting cubicle partitions and panels carrying washbasins or urinals. Note that we’ve orientated the Button-fixes sideways on the access panel below the basin. This is just one of the many ways that you can use Button-fix - a system that has been designed with the installer in mind. Button-fix: the secret fixing for panels.
Download
0 formatsNo download links available.